Speaking at ElixirConf 2018
If you want to learn how to build a weather station, laugh, cry when its over; then come to ElixirConf 2018! You can talk to me in person and I’ll make sure to tell you the wind speed.
It’s ALIVE
To see weather results visit https://weather.frankkumro.com. Refresh the page every 30 seconds to see the latest weather report.
Setting up wireless
Capturing weather data is useless without saving / displaying it. Lake Effect will send the data it captures to a Phoenix application over HTTPS in JSON format. I did not want to dig a trench to run power/Ethernet to the shed, it is around 100 feet from the house. Life is too short to dig holes for fun! Wireless will be used for connectivity and solar for power (future project). Setting up the wireless connection within Nerves is easy.
Nerves Network provides wired and wireless network setup for Nerves projects. As with any hex package, add it to your mix.exs file and run MIX_TARGET=rpi3 mix deps.get.
{:nerves_network, "~> 1.3.6"}
$ MIX_TARGET=rpi3 mix deps.get
Configuration takes place in config/rpi3.exs because I only want wireless enabled for the rpi3 target.
#wireless configuration setting
config :nerves_network, regulatory_domain: "US"
key_mgmt = System.get_env("NERVES_NETWORK_KEY_MGMT") || "WPA-PSK"

config :nerves_network, :default,
  wlan0: [
    ssid: System.get_env("NERVES_NETWORK_SSID"),
    psk: System.get_env("NERVES_NETWORK_PSK"),
    key_mgmt: String.to_atom(key_mgmt)
  ],
  eth0: [
    ipv4_address_method: :dhcp
  ]
Configuration begins with setting your regulatory domain, US in my case. The key type is obtained from your environment vars (at build time) and defaults to WPA-PSK. I use the same approach for the wireless ssid/psk configuration to avoid committing any secrets to the repo. Wired Ethernet is configured to use DHCP, for the event that I need to plug in a cable. Doing so saves me time not having to flash it to configure the port.
I was concerned that the distance between the router and the pi would be too large. Using a wifi strength app on my phone, I determined we had plenty of signal in the shed, dodged a bullet there!
Enabling remote firmware flashing
Once the hardware was mounted in the shed, the nightmares began where I had to shovel a 100 foot path through 4 feet of snow to flash changes. That is simply not happening, and during Lonestar Elixir 2018 Brien Wankel mentioned that he flashed his Jeep remotely. A quick duckduckgo search and I found Nerves.Firmware.SSH. To use Nerves.Firmware.SSH in your project add the hex package to your mix.exs file and run MIX_TARGET=rpi3 mix deps.get.
{:nerves_firmware_ssh, "~> 1.2"}
$ MIX_TARGET=rpi3 mix deps.get
Configuration was tricky
After an hour of testing different configurations, I found that my mixture of ssh keys with and without passphrases caused some sort of issue. Only after I created a directory under ~/.ssh, generated a new key, and used --user-dir was I able to flash the weather station over ssh.
The ssh key is configured by setting the NERVES_FIRMWARE_SSH_KEY env. var on the machine building the firmware. Reading the key in versus adding the key to your config was my preference, YMMV.
# firmware flashing over ssh config
config :nerves_firmware_ssh,
  authorized_keys: [
    File.read!(Path.join(System.user_home!(), System.get_env("NERVES_FIRMWARE_SSH_KEY")))
  ]
I was now able to build and flash my pi from the comfort of my couch, err desk because I hate my couch. Who designs couches that are deep enough to get you stuck?
export MIX_TARGET=rpi3
mix compile
mix firmware
mix firmware.push --user-dir=PATH_TO_SSH_KEY_FOLDER 192.168.xxx.xxx
Note to self: I need to build a test application and send in a bug report…
Creating the Thunder Snow server
Having a personal weather station does me no good if I cannot view the data that is being collected. The first HTTPS interface would be a very basic Phoenix application. Bearer token authentication would be used because I could write a very small plug to block access to the single JSON endpoint that the weather station would be POST’ing to. Data would be displayed on the index page using bootstrap to make things look :ok.
Authentication / Authorization
When the plug is called it must determine if the requester is the weather station. If the bearer token from the request matches the token from config, it’s safe enough to assume the requester is the weather station. For anything other then a toy project, you should evaluate your needs and determine the appropriate auth scheme to use. Refreshing the auth token requires a deploy for both projects, not ideal, but it’s a pet project.
# lib/thunder_snow/plugs/auth.ex
defmodule ThunderSnow.Plugs.Auth do
  @moduledoc """
  Plug to control access to the application based on an HTTP Authorization
  token (bearer).

  If the HTTP request contains a header with the appropriate content, the
  connection will be allowed to progress. Otherwise the execution will halt with
  a 403 error status.

  The token is configured in the environment specific configuration file, using
  the following line:

      config :thunder_snow, ThunderSnow.Plugs.Auth, api_key: "API_KEY_HERE"

  An acceptable header will follow the bearer token authorization format:

      Authorization: Bearer API_KEY_HERE
  """
  import Plug.Conn

  def init(default), do: default

  def call(conn, _default) do
    case is_weather_station?(get_auth_header(conn)) do
      true -> conn
      _ -> conn |> redirect_to_403()
    end
  end

  defp redirect_to_403(conn) do
    conn
    |> put_resp_content_type("application/json")
    |> send_resp(403, build_403_response())
    |> halt()
  end

  defp build_403_response do
    """
    {"status_code": 403, "message": "forbidden"}
    """
  end

  defp is_weather_station?([head | _]) do
    String.equivalent?(
      head,
      "Bearer #{Application.get_env(:thunder_snow, __MODULE__ )[:api_key]}"
    )
  end

  defp is_weather_station?(_), do: false

  defp get_auth_header(conn) do
    Plug.Conn.get_req_header(conn, "authorization")
  end
end
Routing
An API pipeline is necessary for the auth plug to be scoped to the correct request. All API requests will be served under the /api namespace. The root (index) page will be served under / and the standard phoenix browser pipeline.
# lib/thunder_snow_web/router.ex
defmodule ThunderSnowWeb.Router do
  use ThunderSnowWeb, :router

  pipeline :browser do
    plug(:accepts, ["html"])
    plug(:fetch_session)
    plug(:fetch_flash)
    plug(:protect_from_forgery)
    plug(:put_secure_browser_headers)
  end

  pipeline :api do
    plug(:accepts, ["json"])
    plug(ThunderSnow.Plugs.Auth)
  end

  scope "/", ThunderSnowWeb do
    # Use the default browser stack
    pipe_through(:browser)

    get("/", PageController, :index)
  end

  # Other scopes may use custom stacks.
  scope "/api", ThunderSnowWeb do
    pipe_through(:api)
    resources("/reports", ReportController)
  end
end
Database
Wind speed and temperature need to be persisted in Postgres, time for ecto! I decided to index the table based on inserted_at with NULLS LAST due to the fact I plan on selecting on the newest data. If inserted_at is NULL then we have other issues and the data should be weighed the least.
# priv/repo/migrations/20180409170835_create_reports.exs

defmodule ThunderSnow.Repo.Migrations.CreateReports do
  use Ecto.Migration

  def change do
    create table(:reports) do
      add(:wind_speed, :float)
      add(:temperature, :float)

      timestamps()
    end

    create(index(:reports, ["inserted_at DESC NULLS LAST"]))
  end
end
Controller
Phoenix automatically generated the controller code, and I don’t recall making many (if any) changes to it. The reports controller allows the weather station to create a report, which is wind speed / temperature data. This can be slimmed down, but at the moment, it’s not a huge concern for a side project.
# lib/thunder_snow_web/controllers/report_controller.ex
defmodule ThunderSnowWeb.ReportController do
  use ThunderSnowWeb, :controller

  alias ThunderSnow.Weather
  alias ThunderSnow.Weather.Report

  action_fallback(ThunderSnowWeb.FallbackController)

  def create(conn, %{"report" => report_params}) do
    with {:ok, %Report{} = report} put_status(:created)
      |> put_resp_header("location", report_path(conn, :show, report))
      |> render("show.json", report: report)
    end
  end

  def show(conn, %{"id" => id}) do
    report = Weather.get_report!(id)
    render(conn, "show.json", report: report)
  end

  def index(conn, _) do
    report = Weather.get_latest_report()
    render(conn, "show.json", report: report)
  end
end
Template
I am excluding the layout template, which can be viewed here. Two bootstrap cards will be shown with the latest weather data at the time of page load. Nice and simple!
<!-- lib/thunder_snow_web/templates/page/index.html.eex -->
<div class="card-deck">
<div class="card">
<h5 class="card-header">Wind Speed</h5>
<div class="card-body">
<h1 class="card-title display-1 text-center"><%= @weather_report.wind_speed %> MPH</h1>
</div>
</div>
<div class="card">
<h5 class="card-header">Temperature</h5>
<div class="card-body">
<h1 class="card-title display-1 text-center"><%= @weather_report.temperature %> ℉</h1>
</div>
</div>
</div>
Moving the hardware over to a soldered board
I didn’t trust the breadboard to stand the test of time in my shed. Adafruit has a full sized protoboard that I used to move the parts over to and soldered all connections. This reduced the error I was seeing in wind speed data to match the specs ? That was unexpected but very much welcomed. Moving the parts over was a simple copy/paste with some improved routing of wiring. My soldering skills are improving. I purchased a cheaper unit from Amazon that allows me to change tips and temperature control. Please save yourself the headache and get an iron with temperature control, you will thank me later.
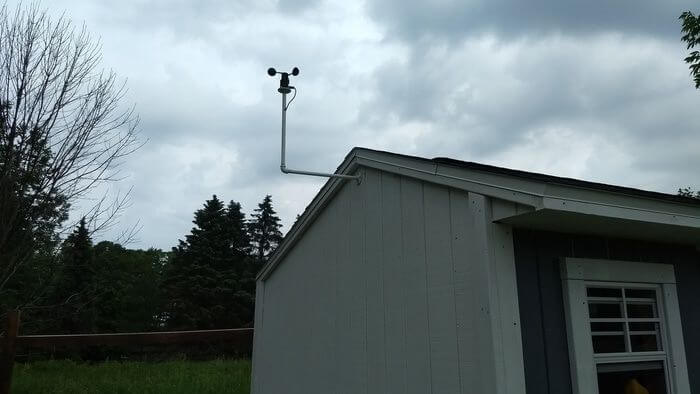
Mounting hardware in shed
The wind speed sensor should be extended up and away from the shed. Iron gas pipes and iron pipe floor mounts were used to build a mount.
Temperature sensor needs to measure air not trapped within the shed. I found a space between the roof and wall to slid it through.

Being exposed to the hot/cold/dusty outdoors may not treat the board right. I was excited to finally install the weather station but I needed a container for the board. Looking around the kitchen I spotted the plastic container for baby formula. Cut a path for the wires to exit and you have a great storage container. The Raspberry Pi already had a snazzy plastic case.

Wiring consisted of extending the wires between all the sensors and providing power.

Power was ran from the garage to the shed, soon to be replaced with a solar panel. If you ever notice the weather data not updating it’s probably because someone ran over the extension cord with a lawn mower (looking at you babe).
Over the next few weeks I will be:
- Updating both repos [lake effect, thunder snow] with new features/improvements/bug fixes.
- Improving documentation
- Learning Elm
- Putting together solar power for the weather station
- Working on my talk
Random bits of info
As always, if you have any questions, please reach out to me on twitter or comment below. I would love to hear what you think of the project so far, and if you enjoy it, please share it!